In order to effectively utilize tracking tags on your website, you need to install Google Tag Manager on WordPress. This article will show you how to do that no matter which WordPress theme you are using!
Google Tag Manager (sometimes shortened to GTM) makes it easy for you to add tracking codes (tags) to your website without having to edit the actual code of WordPress yourself. It also allows you to manage all of your tags from one place with some great quality of life features like versioning and no hassle Google Analytics setup.
So, if you're looking for an easy way to get started with Google Analytics or other tracking tools, GTM is a good option.
In this tutorial, we'll walk you through the steps of installing Google Tag Manager on WordPress.
This walkthrough is broken down into steps outlined below. Feel free to click a step in the outline to skip right to the specified step.
- The GTM Account Structure
- Create Your Google Tag Manager Account & Container
- Find Your Google Tag Manager Installation Code
- Verify Your GTM Account is Live
- Add The GTM Code to WordPress
- How to Verify Your Google Tag Manager is Installed Correctly
Let's get started!
The GTM Account Structure
To fully understand how to setup Google Tag Manager it's important to understand some vocabulary and account structure first.
Your Google Account - This is your normal Google Account that you log into Gmail, YouTube, Google Docs, and more with.
A Tag Manager Account - This is a company-specific account that can be created to house multiple Google Tag Manager containers. You can have multiple Tag Manager accounts associated with your Google Account.
Google Tag Manager Container - This is what we install on your website. A Google Tag Manager container lives inside a Tag Manager Account. You can have multiple containers inside an account (i.e. your company or brand has multiple websites.)
Let's look at this hierarchy visualized. Remember, you can have multiple Tag Manager accounts associated with your Google Account - and then you can have multiple containers associated with each Tag Manager account.

Now, let's look at the hierarchy applied to the Google Tag Manager "All Accounts" view with multiple accounts and containers. This is the page that you will most likely see when navigating to the Google Tag Manager website.

Create Your Google Tag Manager Account & Container
To get started with Google Tag Manager all you need to do is navigate to the GTM website ( https://tagmanager.google.com/ ) and sign into your Google Account.
Once you are logged in, you will have the option available to "Create Account". Click the button.

A screen will pop up asking you for information about the Google Tag Manager account and the first container associated with the account. Fill out the following:
- Account Name
- Country
- Container Name - I like to use the domain that the container will be installed on
- Select the target platform - for the purposes of WordPress choose "Web".

On the next screen you will be asked to accept the terms of service. Please review and accept if you are willing.

If all went well, you will be welcomed with the installation code!
You can navigate back to this screen at any time, but it is a good idea to save this code somewhere safe as we will need it when installing Google Tag Manager on your website.

The next step is to install this code onto your WordPress website!
To get to the right instructions, choose from the following options for your WordPress configuration:
- I am using Elementor on my WordPress website
- I am using Divi on my WordPress website
- I am not using either of those
If you need to find your installation code again then the next section is for you!
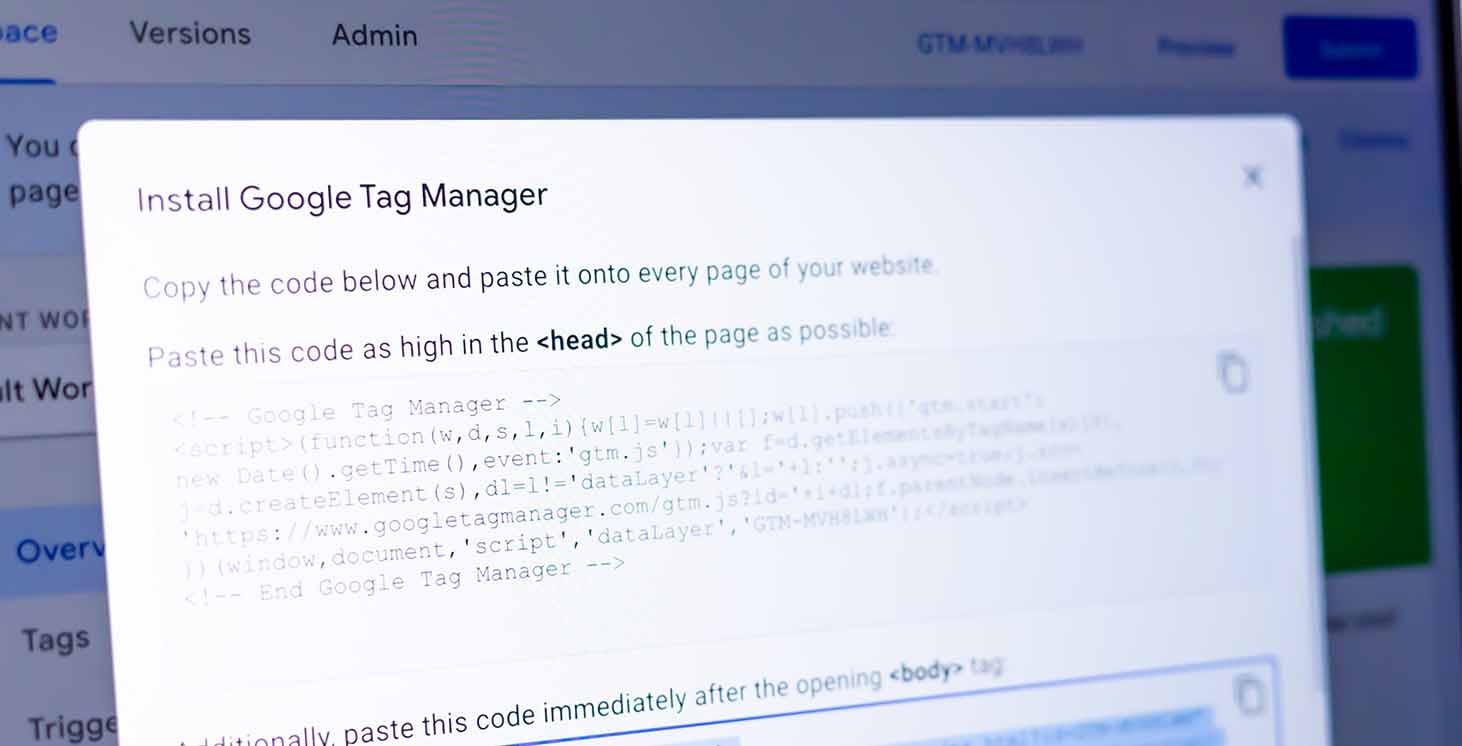
Find Your Google Tag Manager Installation Code
If for any reason at all you need to get back to your Google Tag Manager installation code, here is how you access it:
Navigate to the Google Tag Manager container that you want to find the code for.
On the "Overview" screen, which should be the default screen you see after navigating to the container, click the container ID at the top right. The ID usually starts with "GTM".

After you click on the ID, this pop-up will show up with your Google Tag Manager installation code.

Verify Your Google Tag Manager is Live
After your Google Tag Manager account and container are created, it's always a good idea to verify that your container is live.
Nothing is worse than trying to troubleshoot why your installation is not working only to realize that your container is not live!
To verify that your Google Tag Manager Account and container are live, start by clicking the "Versions" tab in the container navigation menu.

The versions screen will tell you whether or not your container is live!

Add The GTM Code To WordPress
Now that you have your Google Tag Manager Account and container setup, verified it's live, and have access to the installation code - let's get it installed into WordPress!
Be sure to keep your installation code handy for this section as we will be copy and pasting it. If you don't have your code, click here to jump to the section on finding your Google Tag Manager Installation Code.
In this tutorial, we are going to cover installing the code natively with two extremely popular WordPress themes (Elementor and Divi), and then cover how to install the code on any WordPress website - no matter the theme.
For Websites That Use Elementor
If you are using Elementor on your WordPress website, then installing Google Tag Manager involves adding two "Custom Code" snippets into the Elementor settings.
1) Log into the backend of your WordPress website
2) On the left-hand navigation menu select "Elementor". This will reload the page with more menu options now available under the "Elementor" navigation item
3) In the Elementor Sub-menu select "Custom Code"
4) If you do not have custom codes created, you will see the following screen with a green button that says "Add New Custom Code"

If you have existing custom codes, you will need to select "Add New" at the top of the page

5. You will be brought to a page where you will need to complete the following (see image below for screenshot)
- Set your Title to "Google Tag Manager"
- Set the Location to <head>
- Copy and paste the <head> code from your Google Tag Manager installation code
- Hit Publish

6) Once you hit "Publish", a new screen will pop up. This is the Elementor "Publish Settings".
Verify that the condition says "Include: Entire Site" and hit "Save and Close"

7) The first code snippet is now saved! Let's hit the "Add New" button to add the second necessary code snippet.

8) Now we will set up this tag just like before, with just a few tweaks.
- Set your Title to "Google Tag Manager (body)"
- Set the Location to <body> - Start
- Copy and paste the <body> code from your Google Tag Manager installation code
- Hit Publish

9) The Elementor Publish Settings will pop up again. Verify that the code will display on the entire site and then hit "Save and Close".
That's it! You have successfully installed Google Tag Manager on your Elementor WordPress website. The screenshot below is what your "Custom Code" settings page will look like after setting up both code snippets.

The only thing left is to verify that your Google Tag Manager is installed correctly!
You can click here to skip to our section on verifying your Google Tag Manager Installation.
For Website That Use Divi
If you are using Divi from Elegant Themes for your WordPress website, then installing Google Tag Manager involves adding the code to the integrations tab in the Divi settings.
1) Log into the backend of your WordPress website
2) On the left-hand navigation menu select "Divi" which will navigate you to the Divi Theme Options
3) In the Divi Theme Options navigation menu select "Integrations"

4) On the Integrations page you will need to locate the box labeled "Add code to the < head > of your blog". Copy and paste the <head> code from your Google Tag Manager installation code into this box
5) On the same page, find the box labeled "Add code to the < body > (good for tracking codes such as google analytics)". Copy and paste the <body> code from your Google Tag Manager installation code into this box

6) Scroll down and hit "Save Changes"!

You have successfully installed your Google Tag Manager container onto your Divi WordPress website!
Now, it's best practice to verify that your installation is live on your website.
You can skip to our section on verifying your Google Tag Manager Installation.
Install Google Tag Manager On Any WordPress Theme
If you are not using Divi or Elementor, you can still easily get Google Tag Manager installed on your WordPress website!
To do so, we will be installing a plugin that will allow us to install two code snippets.
1) Log into the backend of your website
2) Install the following plugin on your WordPress website and verify that the plugin is enabled: WPCode – Insert Headers and Footers + Custom Code Snippets – WordPress Code Manager

3) On the left-hand navigation menu select "Code Snippets". This will reload the web page and show more menu options under the "Code Snippets" menu
4) On the left-hand navigation menu select "+ Add Snippet"
5) In the "Add Snippet" window select the "All Snippets" category
6) Find the snippet titled "Add Your Custom Code" and select "Use Snippet"

7) Now we will be greeted with a page that allows us to configure the first code snippet
- Set your Title to "GTM Head"
- Switch the snippet to "Active"
- Set the Code Type to "HTML Snippet"
- Copy and paste the <head> code from your Google Tag Manager installation code into the text area
- Set the Location to "Site Wide Header"
- Hit "Save Snippet"

8) The first snippet is complete! Now let's repeat the process of creating a new snippet
9) And configure the second snippet as follows:
- Set your Title to "GTM Body"
- Switch the snippet to "Active"
- Set the Code Type to "HTML Snippet"
- Copy and paste the <body> code from your Google Tag Manager installation code into the text area
- Set the Location to "Site Wide Body"
- Hit "Save Snippet"

10) Your tags are now configured and Google Tag Manager is installed on your WordPress website!
The following screenshot shows what this configuration should look like from the main "All Snippets" menu

Keep reading on to verify that your website has the code installed correctly using Google's own Tag Assistant tool.
How to Verify Your Google Tag Manager is Installed Correctly
Getting the Google Tag Manager code onto your website is only the first step. The only way for you to be 100% sure that your installation is correctly configured is by utilizing a tool that will confirm it for you.
Lucky for us, Google supplies us with that tool in the form of Tag Assistant.
Let's take a look at how to use Google Tag Assistant to verify our Google Tag Manager installation:
1) Navigate to https://tagassistant.google.com/ and log in with the same Google Account as your Google Tag Manager account
2) Click the "Add Domain" button

3) Enter in the full URL (https:// included) and hit "Connect"

4) If all goes well, you will see a "Connected!" screen on the window with Tag Assistant, and a little box at the bottom right of the domain that says "Tag Assistant Connected"
5) Hit "Continue" on the tag assistant window - do not hit "Finish" on your website.

6) Now, to verify that your Google Tag Manager container is installed and published correctly you need to verify that the Google Tag Manager Container ID is showing up in the tag assistant window

7) If the ID is showing up then you are good to start working in Google Tag Manager! You're all set! If it does not it's time to start troubleshooting
Some troubleshooting tips if you are not seeing your ID:
- If your WordPress theme has a cache, try clearing it and check again
- If your WordPress host has a server cache, try clearing it and check again
- Verify that your Google Tag Manager Container is live
- Verify that you have installed all of the Google Tag Manager code onto your website. One missing character will break the installation


![[2025] Configuring Bookeo & Google Analytics 4 (The Easy Way)](/_next/image?url=https%3A%2F%2Fcms.birchriverdg.com%2Fwp-content%2Fuploads%2F2023%2F04%2FCopy-of-How-to-Tell-If-Youre-Overspending-On-Google-Ads-4.png&w=3840&q=75)


![4 Best Escape Room Booking Software Solutions [2024]](/_next/image?url=https%3A%2F%2Fcms.birchriverdg.com%2Fwp-content%2Fuploads%2F2022%2F12%2FEscape-Room-Booking-Systems-1.png&w=3840&q=75)


![[2023] Bookeo Escape Room Integration Guide](/_next/image?url=https%3A%2F%2Fcms.birchriverdg.com%2Fwp-content%2Fuploads%2F2023%2F03%2FBookeo-Series.png&w=3840&q=75)


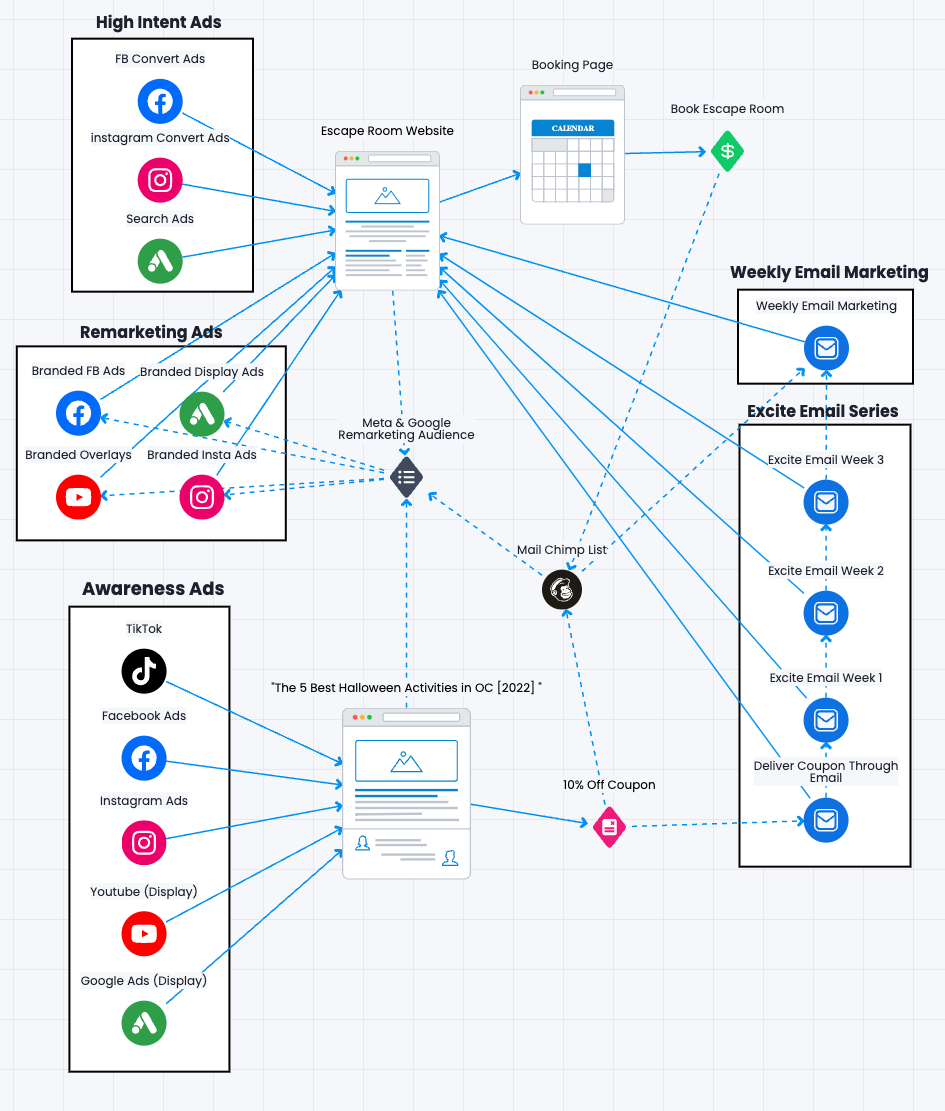
![[2022] The Ultimate Escape Room Marketing Plan](/_next/image?url=https%3A%2F%2Fcms.birchriverdg.com%2Fwp-content%2Fuploads%2F2022%2F08%2FLoyalty-Loop%402x.png&w=3840&q=75)